Hidden Treasures – Part 2: Populate Custom Attributes with Registry Values

JDisc’s R&D department has been adding a lot of new features to our network inventory solution “JDisc Discovery” over the last three years. Some of them are advanced features that are not that obvious to users who do not operate the software on day-by-day basis. The goal of my “Hidden Treasures” series is to present some of those features.
The network documentation solution “JDisc Discovery” already collects a variety of different hardware, software or configuration related values. However most of them are “hard-coded” within the product. But what if you would like to gather additional values? In our early days, we added custom attributes. That enabled our users to define their own attributes and edit them manually. The most prominent examples for those fields are building or room number. After a while, we got some feedback from our users. The message was: “Well, the custom attributes are great, but why do I have to enter them manually while they are stored in the registry. Can’t you add some magic to populate the attributes by reading a device’s registry?”. We really liked this idea and therefore, we added some code to read the content for custom attributes directly from the registry. Later, we added the capability to execute commands or even custom executables or scripts to populate the value. But that will be part of a later article within this series.
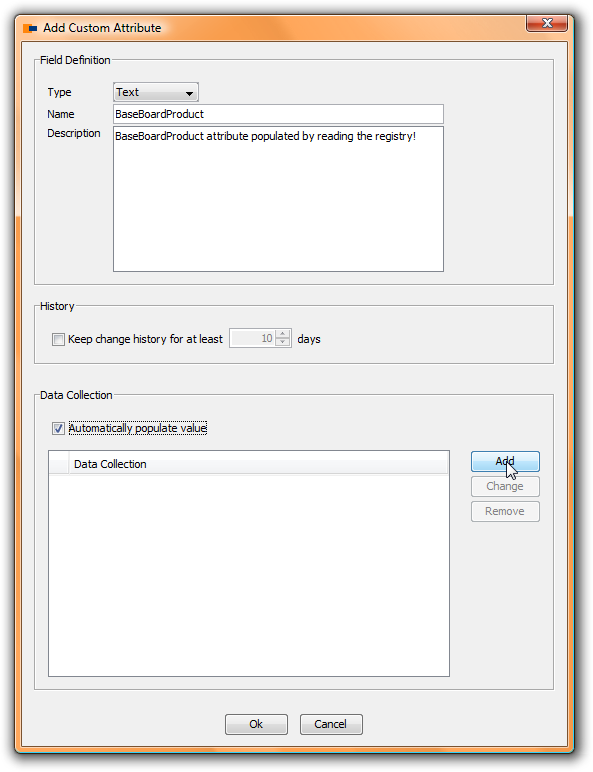
Now let’s get some hands on experience on that feature. First, of course, you need to define a new custom attribute. In our example, suppose we would like to read a registry entry called “BaseBoardProduct” from the “HKEY_LOCAL_MACHINEHardwareDescriptionSystemBios” registry key. First, you need to define a custom attribute with the name “BaseBoardProduct”. Open the “Devices > Custom Attributes > Configuration” dialog and define the new custom attribute.
Now, the magic comes with the “Automatically populate value” checkbox.
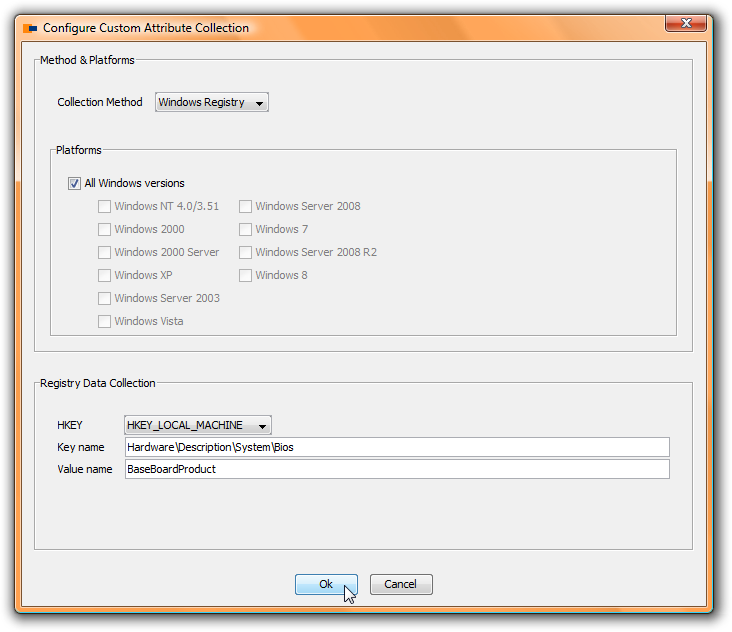
Enable this in order to populate the custom attribute by reading the registry. The next step defines how to collect the value from the Windows Registry. Click on the “Add” button to add a new collection configuration. That’ll open a new dialog
where you define how to collect the value, what operating systems apply on the collection method, and you define the actual registry value to collect.
In the “Collection Method” combobox, you can select between “Windows Registry” and “Execute Command”. In this case, we would like to read the registry so the default is fine for us. The “Platforms” section lets us define the operating systems to collect the data from. Note, that it is possible to define multiple collection methods for a single attribute. That is especially useful when Windows stores the value for an attribute on different Windows versions in different registry keys. For the sake of simplicity, we select the “All Windows versions” checkbox. Select the root key for the registry value in the HKEY combobox, the key name (value name) in the “Key name” field and the registry key (similar to the path). That’s all you need to do in order to define your custom data collection.
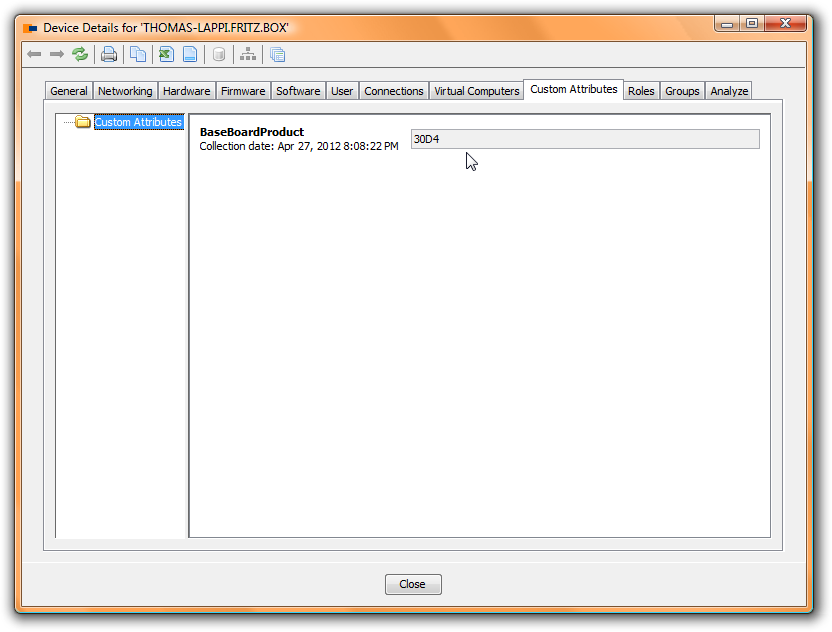
Run a new discovery and review the result. After a successful discovery, the custom attribute contains the value for the attribute collected from the registry.

Summary: In this lesson, you learned how to collect registry values from devices within your network and store them in your custom attributes.

